Ribbon Pakoda


Hardly had any time to recover from Halloween and here is Diwali. For us, it comes a day early, Diwali is tomorrow (Saturday).  I wasn’t going to post any Diwali recipes, simply because I had to whip out six treats in a day and taking pictures for posting a recipe kind of seemed impossible. However, I promised a friend that I would post ribbon pakoda recipe, so here it is.

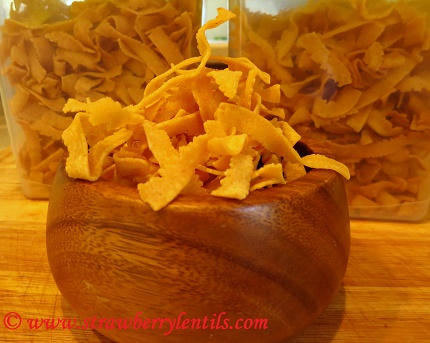
Ribbon Pakodas are deep fried savory snack, usually made during Diwali. Always a huge hit with kids, loved equally by adults too. My aunt makes the best ribbon pakodas I have ever eaten, but also she grinds everything from scratch (soaking rice and all). This is a modification of her recipe, an attempt to reciprocate all the flavors without taking much trouble 🙂

You will need :

  1. Rice flour – 3 cups
  2. Besan / gram flour / Garbanzo flour – 1 cup
  3. Red chilli powder – 3 tsp
  4. Garam masala – 1 tsp
  5. Ginger Garlic paste – 3 tsp
  6. Salt – 4 tsp
  7. Asafoetida – 1/2 tsp
  8. Water (to make dough)
  9. Oil (to fry)
  10. Ghee /Melted butter – 1 tbsp
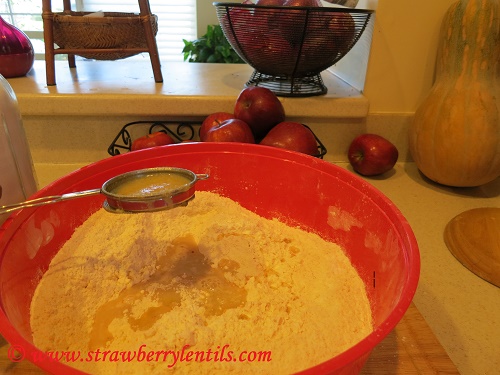
  • Mix rice flour, besan, salt, red chilli powder and garam masala.

Image

  • Dilute ginger garlic paste with water and add asafoetida to this water.

Image

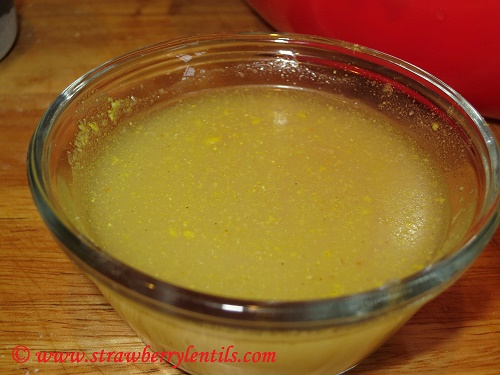
  • Filter this mixture and add just the liquid to the flour mix. Mix the liquid in the flour evenly.

Image

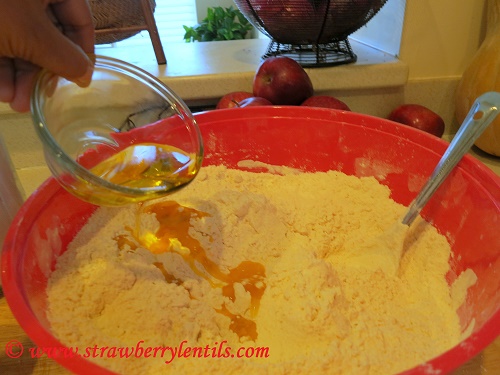
  • Add 1 tbsp of melted butter or melted ghee to the flour and mix well.

Image

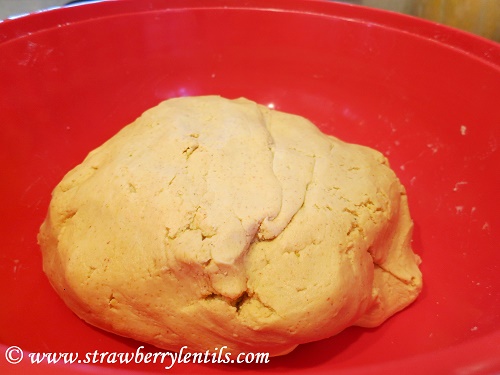
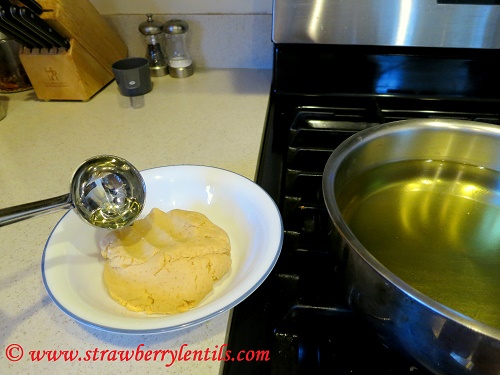
  • Now add enough water to the flour and knead it to a dough (like chappathi dough). We will be working with the dough only in batches, so cover it with a wet towel or wet paper towel until needed.

Image

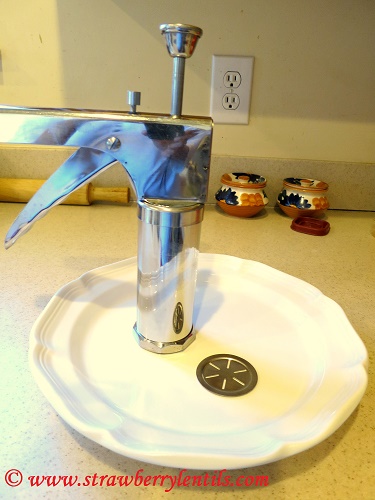
  • This is the “Murukku” press, similar to a cookie press. To make ribbon pakodas, use the disc shown in the picture below.

Image

  • Heat oil in a pot for frying the pakodas. Take a portion of the dough and pour a tablespoon of hot oil on it and knead well. This helps a lot in making the pakodas crispier.

Image

  • Load the dough into the press.

Image

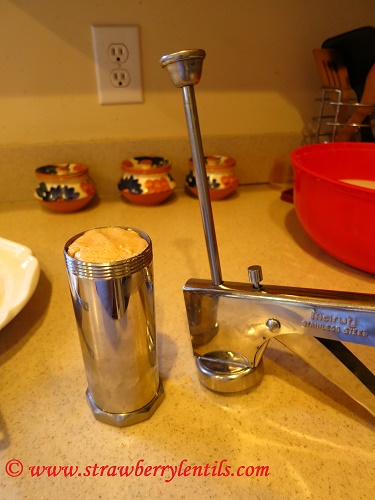
  • Press the dough directly into the hot oil.

Image

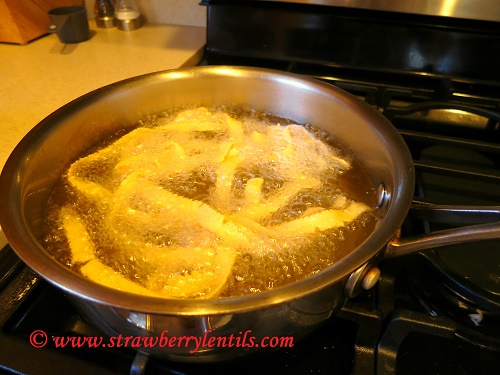
  • Cook until the sizzle calms down. Drain the pakodas on a paper towel.

Image

  • Repeat the steps until all the dough is used. Remember to knead hot oil into the dough right before loading it in the press every time.

The recipe in itself is very simple. Here are some debugging tips that may be useful, if you are trying this for the first time.

  • If the pakodas come out hard, there is not enough fat in the dough, so add some melted butter or ghee to the dough.
  • If the pakodas suck up lots of oil, there is more water in the dough, so add more flour.
  • If it is too hard to press out the pakodas, the dough is too tight, so add more water.
  • If the pakodas  lose shape in oil, the dough is loose, so add more flour.
  • Constantly adjust heat. If the oil is smoking, reduce the heat. If oil is foaming up on the surface increase the heat.
  • As soon as you make the first batch of pakodas, taste them to check salt and crunchiness and make changes accordingly.

These tips hold good for all types of Murukkus/Chaklis.

Wishing you all a wonderful Diwali !!

Image

Poondu Kuzhambu (Garlic Curry)


Aaaah…..Diwali is fast approaching. Next week, I would be whipping out traditional diwali sweets and savories , going through pounds of sugar and gallons of oil. I thought I would post one simple, healthy recipe before jumping into the Diwali binge. I know I will make this curry again a few days after diwali, when I am not high on sugar and my stomach craves for a detox 🙂

Poondu (Garlic) Kuzhambu (curry) is a very simple and a very basic recipe. No fancy ingredients, no fancy cooking techniques, takes less but delivers more. The garlic flavor is very subtle in the curry , so no need  worry about ogre breath after eating this :).

  • You will need :
  1. Garlic – 15 -20 cloves
  2. Curry leaves – few
  3. turmeric – 1 tsp
  4. vellam / jaggery/ brown sugar – 1 tbsp
  5. tamarind water – soak 1 tbsp of tamarind in water and extract the juice
  6. salt to taste
  7. Sesame oil – 1 tbsp

Image

  • To make the masala paste , you will need :
  1. Pearl onions – 10 (use shallots otherwise, but no large onions)
  2. Tomatoes – 1 large or 2 medium
  3. Curry leaves – few
  4. Black pepper – 1.5 tsp
  5. Dry red chillies – 2
  6. cumin – 1.5 tsp

IMG_5075

Grind the above ingredients to a paste. To get a smooth paste, first pulse the dry spices and add the onions and grind for 30 seconds and then add the tomatoes.

Image

  • In a wok, heat 1 tbsp of sesame oil and fry mustard seeds and then saute the curry leaves and the garlic.

Image

  • When the garlic cloves turn slightly golden, add the ground masala paste. (If you used large onions , the raw pungent smell of onions would be unpleasant, so only use pearl onions or shallots.)

Image

  • Dilute with half cup of water and to the curry add turmeric, brown sugar and salt.

Image

  • Taste the curry and see how much acid you will need and according to that add the tamarind water. Often while making tamarind based curries, we tend to go overboard with tamarind and then to compensate it we add more heat and more salt and unintentionally end up with an intense curry. It is wise to add the tamarind after adding all your seasonings, so that you will be better able to judge how much tamarind is needed.

Image

  • Allow the curry to boil and reduce. Cook until the garlic cloves are tender. Traditionally, 3 or 4 tbsp. of oil is used and the curry is cooked until all the oil separates and floats on top. But I always make this curry light and simple, and less oil does not lessen the taste in any ways.

Image

The approximate cooking time will be 15 – 20 mins.  You can put rice to boil, start making this curry and while it is cooking, make a simple vegetable stir fry on the side. So a complete meal in thirty minutes…. most days , that is all the time we get to prepare a meal, right ? 🙂

The garlic cloves that are cooked and soaked in the curry will melt in your mouth….

Image

Spicy Potatoes (Potato Poriyal)


This is pure indulgence. I just posted an oil free rasam recipe few days back and here I am posting this potato side recipe that takes a little more oil than normal vegetable sides. I  L.O.V.E. this traditional, simple potato poriyal so much so, while growing up.. we had it two or three times a week. Now I always pair this poriyal with rasam or yogurt rice , so that the fat content of the entire meal is at bay. This may not be how you want to make the poriyal always, but once in a while it is okay to dive into the indulgence :).

Image

  • Boil and peel the potatoes and cut them into big pieces. Sometimes when I am in a hurry I microwave the potatoes (Heat a medium size potato for 3-4 mins without water in the microwave) also.

Image

  • You will need :
  1. One small red onion or half of a medium onion
  2. curry leaves – few
  3. Garlic – 2 cloves crushed with peel (optional)
  4. Turmeric powder – 1 tsp
  5. Sambar powder – 3 -4 tsp
  6. Salt to taste.

Also you will need mustard seeds or cumin for initial seasoning which is also optional.

[Sambar Powder is readily available in all Indian grocery stores. Most of the available brands are good. If you do not have sambar powder you can replace it with cayenne or red chilli powder.]

ImageImage

  • Heat 2 tbsp of oil in a wok, and fry mustard seeds or any of your preferred seasoning like cumin or fennel or cloves and cinnamon… I used mustard seeds and urad dal . Then saute the onions and curry leaves.

Image

  • Once the onions turn slightly brown, add the turmeric, sambar powder and salt directly to the oil. This will cook the masalas in a flash. Reduce the heat and make sure not to burn the sambar powder.

Image

  • After 30 seconds, add the potatoes to the wok and mix well. This method of adding the masalas to the oil directly, ensures that the potatoes get evenly coated with the spices.

Image

  • Cook for a minute and then add the crushed garlic and cook for another 2 minutes.

Image

  • The dish as of now is ready. But you can leave the potatoes in the wok for another few minutes to crisp.

Image

Once you have the boiled potatoes ready, this will be done in five minutes. As I mentioned earlier, this is usually served as a side for rice, but it can also be used as filling for wraps or sandwiches. These potatoes are crispy, spicy , garlicky……and you will like everything about them 🙂

Image

Rasam (Clear Lentil Soup)


IMG_5056

Whether we had been eating out for three days in a row or had been feasting on festival foods or had been down with cold and stuffy nose, the next morning I wake up with only one thought “Make Rasam”.  Rasam (pronounced russ-um) is a clear soup and is commonly present in a south Indian lunch menu. Usually eaten with rice, rasam is also served as soup or used as a base for other recipes like “rasa vadai”.  If you didn’t already know, you may be surprised to  that rasam is the original “muligtwany soup“. “Muligtwany” comes from two tamil words “Molagu (black pepper) Thanni (water)”.  🙂

There are many versions of rasam. This recipe is of “Paruppu Rasam”, rasam made with ‘paruppu’ or ‘dhal’ or lentils. Having been a meat eater once has its advantage, I can pin point what is missing in the vegetarian version of a recipe. Soups are definitely not the same when you replace chicken stock with vegetable stock. But you can get the warm taste in vegetable soups by adding dhal water. I guess its the protein :).

Though rasam is a very common food, a well made rasam is not that common 🙂  Even experienced cooks make very simple mistakes, I still remember my bad rasam days. But over time, I have found my fool proof rasam recipe that is also quite easy to make. And here it is for you.

  • I use Thur Dal for rasam. (Thur dal is the dried and split pigeon peas). Take about 1/4 cup of Thur dal.

Image

  • You’ll also need :
  1. Plum tomatoes – 3
  2. Curry leaves – handful
  3. Cilantro – a good bunch
  4. Lime – 1/4 (You will need more or less according to the acidity in tomatoes)
  5. Turmeric powder – 1/2 tsp
  6. Asafoetida – 1/4 tsp (Common mistake 1 : heavy hand with asafoetida, results in a bitter rasam. A pinch is plenty.)
  7. Vellam / brown sugar – 2 tsp
  8. salt to taste

(Usually tamarind water is used in rasam. But I am replacing it with tomatoes and lime)

Image

  • For the spice blend :
  1. Black pepper – 2 tsp
  2. Cumin – 2 tsp
  3. coriander seeds – 1 tsp
  4. Garlic cloves – 2 (crushed with the peel)

Image

  • Crush black pepper, cumin, coriander seeds and garlic coarsely. Crush them enough to break to release flavor. Do not make it into a fine paste /powder.

Image

Common mistake 2 : Using store bought rasam powder. I am not against pre-made powders. I have devoted a section of my pantry for pre-made masala powders. But for rasam, strictly no pre-made stuff. And it is so easy to make the spice blend instantly.

  • Wash thur dhal, add a cup of water, add turmeric and asafoetida to the water and also add the tomatoes. Cook until dal is soft. I use a pressure cooker as it cooks dal fast and retains nutrients.

Image

  • Once the dal is soft , mash the tomatoes and dal with the back of a spoon or ladle. If your dal doesn’t mash easily, you need to cook a little longer.

Image

  • Add 4 – 5 cups of water to the mashed dal and tomatoes. Add salt to taste. Also add half of the curry leaves and cilantro.

Image

  •  Add 2 tsp of vellam/brown sugar and bring to one good boil. (If you choose to add tamarind water instead of lemon, you should add it now.If you added tamarind water, boil enough until the raw smell of the tamarind goes away).

Image

  • After one good boil, reduce heat and stir in the spice blend.

Image

  • After you’ve added the spices, the rasam should not be brought to a boil at all. Simmer until foams appear on the surface and turn off the heat.  Allow it to rest for 5 minutes and squeeze in the juice of quarter lemon. Adjust the quantity of lime juice according to how sour the tomatoes are. Also add the remaining curry leaves and coriander leaves. Cover with lid and allow it to rest for at least 10 minutes before serving.

Image

Common mistake 3: Over boiling the rasam. After adding the spices , when you let rasam boil , the flavors become pungent and gives a bitter after taste.

  • Did you notice zero oil was used in this recipe ? Isn’t that awesome ? However, usually rasam is tempered with mustard seeds and dried red chillies for additional flavor. But it is optional. If you choose to temper, heat 1/2 tsp of ghee in a pan, fry 1/2 tsp of black mustard seeds and 1 dried red chilli (cut in small pieces) and pour in the rasam.

Image

Comon mistake 4 : Using too much oil to temper rasam. It is so unapetizing to see rasam with oil floating on its surface. It kills the lightness of it.

It is very important to cover the pot with lid and let the rasam sit for at least ten minutes before serving. After ten minutes when you open the lid, you will have your zen moment, thanks to the aroma from curry leaves, cilantro and the spice blend, all married into one aromatic rasam.

Eat with rice or drink it as soup, or eat it as rice soup 🙂 It will never let you down.

Image

Apple Chutney (Apple thokku)


Is it raining apples in your place ?? It is….in mine 🙂 Though I love apples in any form, shape and color, be it red delicious, gala, fuji, empire…I am a die-hard granny smither 🙂 The perfectly tart , mildly sweet, crunchy party in my mouth. A sprinkle of salt and red chilli powder on the slices of  a granny smith can take me back to my school days, when breaks were about devouring the green mango wedges generously rubbed with salt and chilli powder.  So, I was thinking , why not make the traditional “Manga thokku” using green apples. Few years back I learned to make Green Mango thokku from a friend’s mother-in-law. I extended that recipe to the green apples now and it turned out awesome… !

Thokku is usually served with yogurt rice or dal rice. The spicy and tart thokku compensates for the mild rice. However, it can also be used as a spread for breads and wraps. I made mine super spicy and super tart, if you would prefer a milder version, reduce the spices and use a less tart apple.

  • I used two granny smith apples and an 1 inch piece of ginger.

Image

  •  Peel and grate the apples. Also grate the ginger.

Image

  • To season, you’ll need :
  1. Turmeric – 2 tsp.
  2. Red chilli powder – 3 or 4 tsp.
  3. Garam Masala – 2 tsp (Pumpkin pie spice mix can be used otherwise)
  4. Ground black pepper – 1tsp.
  5. Brown Sugar (vellam) – 1 tbsp.
  6. Grated ginger – 2tsp.
  7. Salt to taste

Image

  • Heat 2 tbsp. of oil in a pot and fry the grated ginger.

Image

  • Then add the grated apples and saute.

Image

  • Saute for a minute and when the juices come out add all the spices.

Image

  • Mix well and continue to cook until the raw smell of the masalas go away and the chutney thickens and becomes glossy.

Image

Image

This is a flavor packed multi-purpose chutney, just one drop is sure to awaken all your taste buds.

Image